Arcane University: Overhead Maps with Skyrim Ingame Editor
This page describes how to make overhead maps of a world space made from in-game screenshots using a utility called Skyrim Ingame Editor. It is the same process used for Beyond Skyrim overhead maps in the last few years.
Skyrim Ingame Editor is an SKSE plugin that allows editing weathers, image spaces, and many other things from within the game and save the result in an .esp. Source code and builds can be found on Github. That said, the program must be built with a specific macro to use it to make overhead maps. Such a build can be downloaded here: File:SIE-Overhead.zip
SIE-Overhead is for AE and SIE-Overhead-SE is for SE. Just unpack the archive into your mods folder and enable only the one you need.
When the tool is started, it teleports the player over a square grid and takes screenshots of the land directly below at each node. So your final overhead resolution depends on two factors: the size of a tile (basically the size of the Skyrim window during shooting) and the size of the zone rendered into one tile. So you need to adjust your game resolution before launching so that it is square. One suggestion is 1000x1000 pixels.
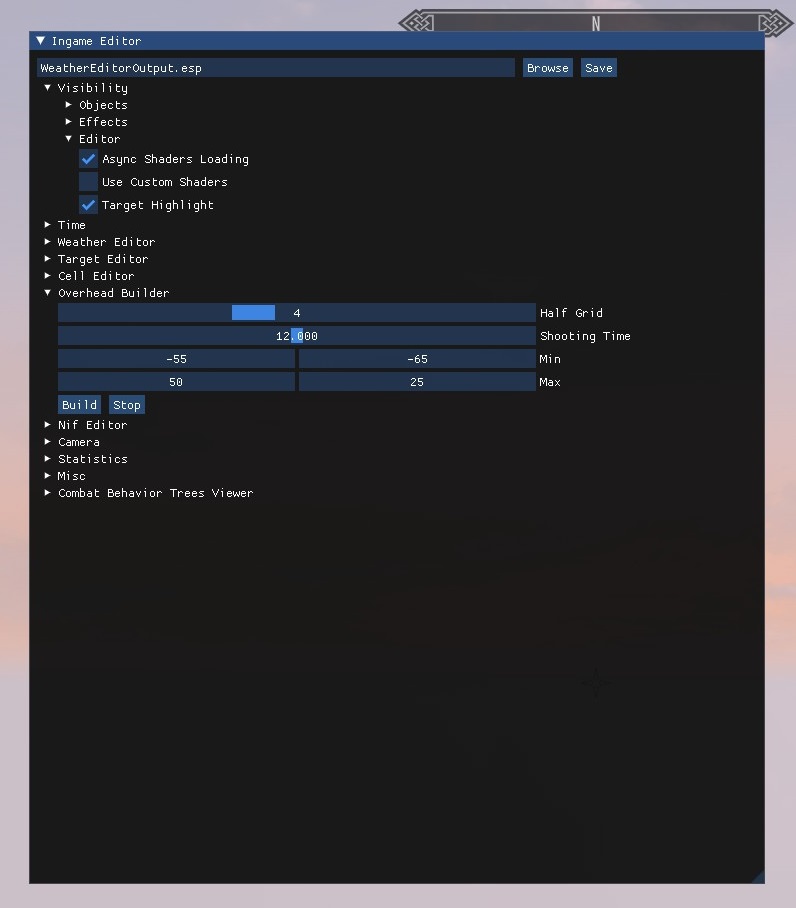
The size of the rendered area is defined by the "Half Grid" parameter in the tool settings. An area of (2 * HalfGrid + 1)^2 cells is rendered simultaneously, so if you keep Half Grid at its default value of 4, it means that a 9x9 cells area is rendered as one tile. It is recommended to set the uGridsToLoad ini parameter to (2 * HalfGrid + 3) so that at least one cell is left on each side of the tile to avoid edge artifacts. With the default uGridsToLoad of 5, you can only use a HalfGrid of 1. Save the ini settings into a separate profile in your mod manager for the overhead tool if you intend to use it often.
In order to start shooting, load into the target worldspace, open SIE with F7 and configure settings in the "Overhead Builder" section: "Shooting Time" defines the time of day at which shooting occurs - so if you want a night overhead, set it to 0. "Min" and "Max" are coordinates of the lower left and upper right cells in the overhead. Finally, if you want semitransparent water, you will need to enable the "Use Custom Shaders" option in the "Visibility/Editor" section.
After everything is configured, hit the "Build" button. The process will start. Do not try to move the camera or minimize the Skyrim window until it's finished.
The result of the process is a number of tile screenshots named "overhead_X_Y.png" in the Skyrim root folder, where X and Y represent the coordinates of the central cell of the tile. They need to be merged into a single image. For this you, can use this perfect ChatGPT-generated Python script. Use it as in this example command:
python overhead_merge.py YourTilesDirectoryPath
and it will output a merged image into the same directory. You'll also need the Pillow library, which can be installed with pip install Pillow
import sys
import os
from PIL import Image
import re

def merge_images_by_order(directory):
    # Regular expression to match filenames in the format overhead_X_Y, including negative numbers
    pattern = re.compile(r'overhead_-?\d+_-?\d+\.(png|jpg|jpeg|bmp|gif)', re.IGNORECASE)

    # Get all image file names in the directory that match the pattern
    image_files = [f for f in os.listdir(directory) if pattern.match(f)]

    # Dictionary to store the images with their X, Y coordinates
    images_dict = {}

    for file in image_files:
        img_path = os.path.join(directory, file)
        img = Image.open(img_path)

        # Extract X and Y from the filename
        name, ext = os.path.splitext(file)
        _, x, y = name.split('_')
        x, y = int(x), int(y)

        if x not in images_dict:
            images_dict[x] = []

        images_dict[x].append((y, img))

    # Sort the images_dict by X and each sublist by Y in reverse order
    sorted_images = []
    for x in sorted(images_dict.keys()):
        sorted_images.append(sorted(images_dict[x], key=lambda t: t[0], reverse=True))

    # Determine the grid size (assumes all images are of the same size)
    if sorted_images:
        sample_image = sorted_images[0][0][1]
        img_width, img_height = sample_image.size

        num_cols = len(sorted_images)
        num_rows = max(len(sublist) for sublist in sorted_images)

        total_width = num_cols * img_width
        total_height = num_rows * img_height

        # Create a new image with the total width and height
        new_img = Image.new('RGB', (total_width, total_height))

        # Paste each image into the new image at the correct position
        for x_idx, sublist in enumerate(sorted_images):
            for y_idx, (_, img) in enumerate(sublist):
                new_img.paste(img, (x_idx * img_width, y_idx * img_height))

        # Save the result
        output_path = os.path.join(directory, 'merged_image.jpg')
        new_img.save(output_path)
        print(f"Merged image saved as {output_path}")
    else:
        print("No valid images found in the directory.")

if __name__ == "__main__":
    if len(sys.argv) != 2:
        print("Usage: python merge_images.py <directory_path>")
        sys.exit(1)

    directory = sys.argv[1]

    if not os.path.isdir(directory):
        print(f"Error: {directory} is not a valid directory.")
        sys.exit(1)

    merge_images_by_order(directory)
